Machine Learning Image Restoration - How does Deoldify Work?
Written in March 2022
The main goal of this project is to understand the deoldify repo. This was a ML program created by the fastai community for recolaristion and super-resolution. This was the first project that came to my mind. There are numerous recolaristion project. That will be checking out as well.
The first week was trying to even run this. The model takes so much memory that it broke my PC. Leading to me removing and reinstalling anaconda. And my downloads folder. Which sucked. Deoldify has google colab version but it does not have a way to see the code used. As it’s simply an import.
I worked out that I could copy and paste the code from the python script into the notebook. By going through the python files and pasting them into cells. You could start to get an idea how the program worked on a high level. It could a while to get the cells in the right order so it could start working. As a cell will give errors for classes and methods not yet defined.
After changing the cells order and dealing with the imports. I started to get the program to work. I had to get the requirements text file. Which can be annoying in Google Colab due to the restarting nature of clearing out memory. But still got it to work.
First stage was adding comments to the code, helping me to slowly understand what the various methods did. Then I typed up most of the codebase that seem relevant to my use case. Doing this means I had to see the code first hand. Funny enough writing the code was not the hardest part. It was debugging the various errors from misspelling various class names. This was great because if something broke, I could see the logical flow of the program and see how the program interacts with other classes.
One of my most important steps I did was creating a diagram following the main functions and classes until they hit the standard library or the Fastai library. So I could see all code written that is not part a library. Great way to understand how the prograe worked on a high level.
I like to call it recursively learning. As I took the last function called, in the codebase then followed up all the way to the top of the notebook. It allows you to see various classes and methods that were called inside other classes. The code was written in a object-oriented manner. Hence the various classes and parameters being passed to various methods and subclasses.
This is a great codebase to look at. Well written code. Something to aspire to be honest. After understanding the main aspects it all snaps into piece. Great how the various classes relate to each other. While still using other libraries like fastai.
Summary of the Code
The codebase is set up in way that configurations like GPU settings are done first. Then a lot of time is spend building the architecture of U-net used for inference or training.
Due to the OOP nature of the code. The U-net is separated into various parts. We have custom layers and custom pixel shuffling which are separate classes. Which are then used in the Bigger U-Net class. And the U-Net consists of blocks which the custom layers are used. And inserted inside the U-net arch. To be more precise added between layers where the activation changes. After the U-Net arch is created the author uses other classes to create the Fastai learner object. This object is to train ML models in fastai. As we are using a pre-trained U-net. The object is used to load weights into the u-net arch. These various classes help pass though the image data into the ML model.
The most important class in the code base is the modelimageviewer. A class that takes in the image and calls on the ML model and extracts filters from it. Then passed out a filtered image that can be used for plotting. The methods that plot and save the images are stored in that class. Best to think of the modelimageviewer as a funnel.
Custom Layers
#layers.py
def custom_conv_layer(
    ni: int, #number of inputs
    nf: int, # number of filters / out_channel
    ks: int = 3, # kernal size
    stride: int = 1, # movment across image
    padding: int = None,
    bias: bool = None,
    is_1d: bool = False,
    norm_type: Optional[NormType] = NormType.Batch,
    use_activ: bool = True,
    leaky: float = None,
    transpose: bool = False,
    init: Callable = nn.init.kaiming_normal_,
    self_attention: bool = False,
    extra_bn: bool = False,
):
    "Create a sequence of convolutional (`ni` to `nf`), ReLU (if `use_activ`) and batchnorm (if `bn`) layers."
The parameters here are just settings you would see in any other convolutional layer. Extra settings include self attention.
if padding is None:
      padding = (ks - 1) // 2 if not transpose else 0
    bn = norm_type in (NormType.Batch, NormType.BatchZero) or extra_bn == True
    if bias is None:
      bias = not bn
    conv_func = nn.ConvTranspose2d if transpose else nn.Conv1d if is_1d else nn.Conv2d
    conv = init_default(
        conv_func(ni, nf, kernel_size=ks, bias=bias, stride=stride, padding=padding),
        init,
    )
    if norm_type == NormType.Weight:
      conv = weight_norm(conv)
    elif norm_type == NormType.Spectral:
      conv = spectral_norm(conv)
    layers = [conv]
    if use_activ:
      layers.append(relu(True, leaky=leaky))
    if bn:
      layers.append((nn.BatchNorm1d if is_1d else nn.BatchNorm2d) (nf))
    if self_attention:
      layers.append(SelfAttention(nf))
    return nn.Sequential(*layers)
This is the first cell we start work on creating the architecture and model. Here a custom convolution layer is built. On the GitHub page it says: “Except the generator is a pretrained U-Net, and I've just modified it to have the spectral normalization and self-attention. It's a pretty straightforward translation.” We added options of spectral and self attention in this cell.
elif norm_type == NormType.Spectral:
      conv = spectral_norm(conv)

if self_attention:
      layers.append(SelfAttention(nf))
Fastai classes added to the layer.
class CustomPixelShuffle_ICNR(nn.Module):
    "Upsample by `scale` from `ni` filters to `nf` (default `ni`),"
    def __init__(
        self,
        ni: int,
        nf: int = None,
        scale: int = 2,
        blur: bool = False,
        leaky: float = None,
        **kwargs
    ):
      super().__init__()
      nf = ifnone(nf, ni) #ifnone: Fast.ai core.py
      self.conv = custom_conv_layer(
          ni, nf * (scale ** 2), ks=1, use_activ=False, **kwargs
      )
      icnr(self.conv[0].weight)
      self.shuf = nn.PixelShuffle(scale)
      # Blurring over (h*w) kernel
      # "Super-Resolution using Convolutional Neural Networks without Any Checkerboard Artifacts"
      # - https://arxiv.org/abs/1806.02658
      self.pad = nn.ReplicationPad2d((1, 0, 1, 0))
      self.blur = nn.AvgPool2d(2, stride=1)
      self.relu = relu(True, leaky=leaky)
    def forward(self, x):
        x = self.shuf(self.relu(self.conv(x)))
        return self.blur(self.pad(x)) if self.blur else x
Pixel shuffling works as follows, we take an low-resolution image then we create an sub-pixel image by adding around and between the original pixels. Then we use an kernel to pass though the sub-pixel image activating the weights activating with the pixels. Some pixels are by non-zero pixel, some with padding etc.
Real-Time Single Image and Video Super-Resolution Using an Efficient Sub-Pixel Convolutional Neural Network: https://arxiv.org/abs/1609.05158
Add-on to the previous papers: https://arxiv.org/abs/1609.07009
U-Net Arch
class UnetBlockDeep(nn.Module):
  "A quasi-UNet block, using `PixelShuffle_ICNR upsampling`. using `nn.PixelShuffle`, `icnr` init, and `weight_norm`."

  def __init__(
      self,
      up_in_c: int,
      x_in_c: int,
      hook: Hook,
      final_div: bool = True,
      blur: bool = False,
      leaky: float = None,
      self_attention: bool = False,
      nf_factor: float = 1.0,
      **kwargs
  ):
      super().__init__()
      self.hook = hook
      self.shuf = CustomPixelShuffle_ICNR(
          up_in_c, up_in_c // 2, blur=blur, leaky=leaky, **kwargs
      )
      self.bn = batchnorm_2d(x_in_c)
      ni = up_in_c // 2 + x_in_c
      nf = int((ni if final_div else ni // 2) * nf_factor)
      self.conv1 = custom_conv_layer(ni, nf, leaky=leaky, **kwargs)
      self.conv2 = custom_conv_layer(
          nf, nf, leaky=leaky, self_attention=self_attention, **kwargs
      )
      self.relu = relu(leaky=leaky)

  def forward(self, up_in: Tensor) -> Tensor:
    s =  self.hook.stored
    up_out = self.shuf(up_in)
    ssh = s.shape[-2:]
    if ssh != up_out.shape[-2:]:
      up_out = F.interpolate(up_out, s.shape[-2:], mode='nearest')
    cat_x = self.relu(torch.cat([up_out, self.bn(s)], dim=1))
    return self.conv2(self.conv1(cat_x))
Now we create a class with conv and pixel shuffling from earlier. Inside the class we define how they layers will be used. We store the pixel_shuffle in self.shuf. We define batchNorm and the 2 convolutional layers. One with self attention and one with a RELU layer.
When creating the forward method we create a variable to help save the stored hooks. This is done Because we will use the hooks to get the number of activations for each layer. The up-sample is created from an pixel shuffle.
Afterwards the data is contracted and passed though a relu function. Which is passed through two convolutional layers.
class DynamicUnetDeep(SequentialEx):
  "Create a U-net from a given architecture"

  def __init__(
      self,
      encoder: nn.Module,
      n_classes: int,
      blur: bool = False,
      blur_final=True,
      self_attention: bool = False,
      y_range: Optional[Tuple[float, float]] = None,
      last_cross: bool = True,
      bottle: bool = False,
      norm_type: Optional[NormType] = NormType.Batch,
      nf_factor: float = 1.0,
      **kwargs
  ):
      extra_bn = norm_type == NormType.Spectral
      imsize = (256, 256) #image size
      # sfs = save features???
      sfs_szs = model_sizes(encoder, size=imsize) #model sizes sfs???
      print('sfs_szs_DynamicUnetDeep: ', sfs_szs)
      sfs_idxs = list(reversed(_get_sfs_idxs(sfs_szs))) # sfs IDs
      print('sfs_idxs_sfs_szs_DynamicUnetDeep:', sfs_idxs)
      self.sfs = hook_outputs([encoder[i] for i in sfs_idxs]) # store weights
      print('self.sfs: ', self.sfs)
      x = dummy_eval(encoder, imsize).detach() # dummy input to set up model

      ni = sfs_szs[-1][1]
      middle_conv = nn.Sequential(
          custom_conv_layer(
              ni, ni * 2, norm_type=norm_type, extra_bn=extra_bn, **kwargs
          ),
          custom_conv_layer(
              ni * 2, ni, norm_type=norm_type, extra_bn=extra_bn, **kwargs
          ),
      ).eval()
      x = middle_conv(x)
      layers = [encoder, batchnorm_2d(ni), nn.ReLU(), middle_conv]

      for i, idx in enumerate(sfs_idxs):
        not_final = i != len(sfs_idxs) - 1
        up_in_c, x_in_c = int(x.shape[1]), int(sfs_szs[idx][1])
        do_blur = blur and (not_final or blur_final)
        sa = self_attention and (i == len(sfs_idxs) - 3)
        unet_block = UnetBlockDeep(
            up_in_c,
            x_in_c,
            self.sfs[i],
            final_div=not_final,
            blur=blur,
            self_attention=sa,
            norm_type=norm_type,
            extra_bn=extra_bn,
            nf_factor=nf_factor,
            **kwargs
        ).eval()
        layers.append(unet_block)
        x = unet_block(x)

      ni = x.shape[1]
      if imsize != sfs_szs[0][-2:]:
        layers.append(PixelShuffle_ICNR(ni, **kwargs))
      if last_cross:
        layers.append(MergeLayer(dense=True))
        ni += in_channels(encoder)
        layers.append(res_block(ni, bottle=bottle, norm_type=norm_type, **kwargs))
      layers += [
                 custom_conv_layer(ni, n_classes, ks=1, use_activ=False, norm_type=norm_type)
      ]
      if y_range is not None:
        layers.append(SigmoidRange(*y_range))
      super().__init__(*layers)
Breakdown of the class
def __init__(
      self,
      encoder: nn.Module,
      n_classes: int,
      blur: bool = False,
      blur_final=True,
      self_attention: bool = False,
      y_range: Optional[Tuple[float, float]] = None,
      last_cross: bool = True,
      bottle: bool = False,
      norm_type: Optional[NormType] = NormType.Batch,
      nf_factor: float = 1.0,
      **kwargs
  ):
We will pass the U-net via the encoder argument. We have some settings like blur, used for the sigmoidal activation function.
This paper talks about it https://arxiv.org/abs/1806.02658
After we create all the layers and blocks. We can stack them together to built the U-net architecture.
When the class is called later on we would be using resnet for the weights.
extra_bn = norm_type == NormType.Spectral
imsize = (256, 256) #image size
sfs_szs = model_sizes(encoder, size=imsize)
We use Spectral for batch_norm. Define image size. And sfs_szs size of features for the resnet model.
sfs_idxs = list(reversed(_get_sfs_idxs(sfs_szs))) # sfs IDs
self.sfs = hook_outputs([encoder[i] for i in sfs_idxs]) # store weights
sfs_idxs lets us grab the layers which the activation has changed. This where we would insert our U-net blocks into the resnet. Self.sfs is simply a way of storing the features of the various layers we want to change.
ni = sfs_szs[-1][1]
      middle_conv = nn.Sequential(
          custom_conv_layer(
              ni, ni * 2, norm_type=norm_type, extra_bn=extra_bn, **kwargs
          ),
          custom_conv_layer(
              ni * 2, ni, norm_type=norm_type, extra_bn=extra_bn, **kwargs
          ),
      ).eval()
We define the number of inputs that will be funnelled into the convolutional layers.
The convolutional layers are stacked together using the Pytorch sequential function.
layers = [encoder, batchnorm_2d(ni), nn.ReLU(), middle_conv]We have list of layers that now stacked together to create the U-net. We have the resnet layers first, then a batch_norm, RELU layer. And some convolutional layers.
for i, idx in enumerate(sfs_idxs):
        not_final = i != len(sfs_idxs) - 1
        up_in_c, x_in_c = int(x.shape[1]), int(sfs_szs[idx][1])
        do_blur = blur and (not_final or blur_final)
        sa = self_attention and (i == len(sfs_idxs) - 3)
        unet_block = UnetBlockDeep(
            up_in_c,
            x_in_c,
            self.sfs[i],
            final_div=not_final,
            blur=blur,
            self_attention=sa,
            norm_type=norm_type,
            extra_bn=extra_bn,
            nf_factor=nf_factor,
            **kwargs
        ).eval()
        layers.append(unet_block)
        x = unet_block(x)
for i, idx in enumerate(sfs_idxs) creates a counter while looping though the selected resnet layers. Helps us keep track of the layers we interating in the list.
not_final = i != len(sfs_idxs) - 1Saves the position of the final layer
up_in_c, x_in_c = int(x.shape[1]), int(sfs_szs[idx][1])do_blur = blur and (not_final or blur_final)
sa = self_attention and (i == len(sfs_idxs) - 3)We get the position of the where to do the blur effect when blur is true. And it’s not the layer nor the final blur layer. Position to place self-attention, is 3 places before final layer.
unet_block = UnetBlockDeep(
            up_in_c,
            x_in_c,
            self.sfs[i],
            final_div=not_final,
            blur=blur,
            self_attention=sa,
            norm_type=norm_type,
            extra_bn=extra_bn,
            nf_factor=nf_factor,
            **kwargs
        ).eval()
        layers.append(unet_block)
        x = unet_block(x)
These variables are now passed as arguments for the unet block.
ni = x.shape[1]
      if imsize != sfs_szs[0][-2:]:
        layers.append(PixelShuffle_ICNR(ni, **kwargs))
      if last_cross:
        layers.append(MergeLayer(dense=True))
        ni += in_channels(encoder)
        layers.append(res_block(ni, bottle=bottle, norm_type=norm_type, **kwargs))
When imsize does not match the current layer we can use the pixelshuffle almost like a upsample. Remember a lot of this code is based on this repo [insert link to docs and colab] https://docs.fast.ai/vision.models.unet.html
def get_colorize_data(
    sz: int,
    bs: int,
    crappy_path: Path,
    good_path: Path,
    random_seed: int = None,
    keep_pct: float = 1.0,
    num_workers: int = 8,
    stats: tuple = imagenet_stats,
    xtra_tfms=[],
) -> ImageDataBunch:
    src = (
        ImageImageList.from_folder(crappy_path, convert_mode='RGB')
        .use_partial_data(sample_pct=keep_pct, seed=random_seed)
        .split_by_rand_pct(0.1, seed=random_seed)
    )

    data = (
        src.label_from_func(lambda x: good_path / x.relative_to(crappy_path))
        .transform(
            get_transforms(
                max_zoom=1.2, max_lighting=0.5, max_warp=0.25, xtra_tfms=xtra_tfms
            ),
            size=sz,
            tfm_y=True
        )
        .databunch(bs=bs, num_workers=num_workers, no_check=True)
        .normalize(stats, do_y=True)
    )
    data.c = 3
    return data
This is pretty much a helper function. Create a dummy databuch object. To help export the weights of pretrained dataset.
def get_dummy_databunch() -> ImageDataBunch:
  path = Path('./dummy/')
  return get_colorize_data(
      sz=1, bs=1, crappy_path=path, good_path=path, keep_pct=0.001
  )
Here we just use the get_colorise_data function we declared earlier.
Now we start with the Ifilter abstract class:
class IFilter(ABC):
  @abstractmethod
  def filter(
      self, orig_image: PilImage, filtered_image: PilImage, render_factor: int
      ) -> PilImage:
      pass
We import the ABC to make it into an abstract class. We create an abstract method which will be used for the other classes that inherit Ifilter. The abstract method simply takes in the original image, filtered image and render factor. And returns are PILimage
Render factor sets the resolution of the image. The higher the resolution factor the pixels the model gets to play with. But results vary per image. So you want try out a whole range to get the intended results for your image.
class BaseFilter(IFilter):
  def __init__(self, learn: Learner, stats: tuple = imagenet_stats):
    super().__init__()
    self.learn = learn

    if not device_settings.is_gpu():
      self.learn.model = self.learn.model.cpu()

    self.device = next(self.learn.model.parameters()).device
    self.norm, self.denorm = normalize_funcs(*stats)

  def _transform(self, image: PilImage) -> PilImage:
    return image

  def _scale_to_square(self, orig: PilImage, targ: int) -> PilImage:
    # simple stretch to fit a square really make a big difference in rendering quality/consistency.
    # I've tried padding to the square as well (reflect, symetric, constant, etc). Not as good!
    targ_sz = (targ, targ)
    return orig.resize(targ_sz, resample=PIL.Image.BILINEAR)

  def _get_model_ready_image(self, orig: PilImage, sz: int) -> PilImage:
    result = self._scale_to_square(orig, sz)
    result = self._transform(result)
    return result

  def _model_process(self, orig: PilImage, sz: int) -> PilImage:
    model_image = self._get_model_ready_image(orig, sz)
    x = pil2tensor(model_image, np.float32)
    x = x.to(self.device)
    x.div_(255)
    x, y = self.norm((x,x), do_x=True)

    try:
      result = self.learn.pred_batch(
          ds_type=DatasetType.Valid, batch=(x[None], y[None]), reconstruct=True
      )
    except RuntimeError as rerr:
      if 'memory' not in str(rerr):
        raise rerr
      print('Warning: render_factor was set too high, and out of memory error resulted. Returning original image.')
      return model_image

    out = result[0]
    out = self.denorm(out.px, do_x=False)
    out = image2np(out * 255).astype(np.uint8)
    return PilImage.fromarray(out)

  def _unsquare(self, image: PilImage, orig: PilImage) -> PilImage:
    targ_sz = orig.size
    image = image.resize(targ_sz, resample=PIL.Image.BILINEAR)
    return image
BaseFilter will be used for the other filter classes that will be used next. The class creates helper methods to help take in an image and turn them into arrays and vice versa.
def __init__(self, learn: Learner, stats: tuple = imagenet_stats):
    super().__init__()
    self.learn = learn

    if not device_settings.is_gpu():
      self.learn.model = self.learn.model.cpu()

    self.device = next(self.learn.model.parameters()).device
    self.norm, self.denorm = normalize_funcs(*stats)
For the initialisation function the Leaner object is passed. Then we set up device settings. As pass the model into the device. We also setup the batch norms with the stats arg.
def _transform(self, image: PilImage) -> PilImage:
    return image

  def _scale_to_square(self, orig: PilImage, targ: int) -> PilImage:
    # simple stretch to fit a square really make a big difference in rendering quality/consistency.
    # I've tried padding to the square as well (reflect, symetric, constant, etc). Not as good!
    targ_sz = (targ, targ)
    return orig.resize(targ_sz, resample=PIL.Image.BILINEAR)
Internal functions helped to use maniplate PILimages. _transform return simple Pilimage. Done so it can used to passed into other methods.
Scale to square, stretching the image into square tends to improve performance.
def _get_model_ready_image(self, orig: PilImage, sz: int) -> PilImage:
    result = self._scale_to_square(orig, sz)
    result = self._transform(result)
    return result
We get an PIL_image which has been transformed and ready to be passed into the model.
def _model_process(self, orig: PilImage, sz: int) -> PilImage:
    model_image = self._get_model_ready_image(orig, sz)
    x = pil2tensor(model_image, np.float32)
    x = x.to(self.device)
    x.div_(255)
    x, y = self.norm((x,x), do_x=True)

    try:
      result = self.learn.pred_batch(
          ds_type=DatasetType.Valid, batch=(x[None], y[None]), reconstruct=True
      )
    except RuntimeError as rerr:
      if 'memory' not in str(rerr):
        raise rerr
      print('Warning: render_factor was set too high, and out of memory error resulted. Returning original image.')
      return model_image

    out = result[0]
    out = self.denorm(out.px, do_x=False)
    out = image2np(out * 255).astype(np.uint8)
    return PilImage.fromarray(out)
def _unsquare(self, image: PilImage, orig: PilImage) -> PilImage:
targ_sz = orig.size
image = image.resize(targ_sz, resample=PIL.Image.BILINEAR)
return imageThis method undoes the fitting into square from earlier.
ColouriseFilter helps create the recolored image:
class ColorizerFilter(BaseFilter):
  def __init__(self, learn: Learner, stats: tuple = imagenet_stats):
    super().__init__(learn=learn, stats=stats)
    self.render_base = 16
    # only loads the instance when used the modelimagevisualiser

  def filter(
      self, orig_image: PilImage, filtered_image: PilImage, render_factor: int, post_process: bool = True
  ) -> PilImage:
      render_sz = render_factor * self.render_base
      model_image = self._model_process(orig=filtered_image, sz=render_sz)
      raw_color = self._unsquare(model_image, orig_image)

      if post_process:
        print('self._post_process(raw_color, orig_image)', type(self._post_process(raw_color, orig_image)))
        return self._post_process(raw_color, orig_image)
      else:
        print(raw_color)
        return raw_color

  def _transform(self, image: PilImage) -> PilImage:
    print('image.convert(LA).convert(RGB)', type(image.convert('LA').convert('RGB')))
    return image.convert('LA').convert('RGB')

  def _post_process(self, raw_color: PilImage, orig: PilImage) -> PilImage:
    color_np = np.asarray(raw_color)
    orig_np = np.asarray(orig)
    color_yuv = cv2.cvtColor(color_np, cv2.COLOR_BGR2YUV)
    # do a black and white transform first to get better luminance values
    orig_yuv = cv2.cvtColor(orig_np, cv2.COLOR_BGR2YUV)
    hires = np.copy(orig_yuv)
    hires[:, :, 1:3] = color_yuv[:, :, 1:3]
    final = cv2.cvtColor(hires, cv2.COLOR_YUV2BGR)
    final = PilImage.fromarray(final)
    print('final', type(final))
    return final
  def filter(
      self, orig_image: PilImage, filtered_image: PilImage, render_factor: int, post_process: bool = True
  ) -> PilImage:
      render_sz = render_factor * self.render_base
      model_image = self._model_process(orig=filtered_image, sz=render_sz)
      raw_color = self._unsquare(model_image, orig_image)

      if post_process:
        print('self._post_process(raw_color, orig_image)', type(self._post_process(raw_color, orig_image)))
        return self._post_process(raw_color, orig_image)
      else:
        print(raw_color)
        return raw_color
This filter method allows to extract giving filters need to colourise the image.
It inherits the BaseFilter so it can use the helper methods created earlier. We create another filter method same parameters from the Ifilter with post_process as well.
render_sz = render_factor * self.render_base
      model_image = self._model_process(orig=filtered_image, sz=render_sz)
      raw_color = self._unsquare(model_image, orig_image)
We get the render size, by multiplying the render_factor with render_base. We create an image ready to be put into the model. With the model_process helper function. Then we extract the colours with _unsquare.
if post_process:
        return self._post_process(raw_color, orig_image)
      else:
        return raw_color
We return the post_process object or raw_color if post_process is True as a argument.
def _transform(self, image: PilImage) -> PilImage:
    return image.convert('LA').convert('RGB')
def _post_process(self, raw_color: PilImage, orig: PilImage) -> PilImage:
color_np = np.asarray(raw_color)
    orig_np = np.asarray(orig)
    color_yuv = cv2.cvtColor(color_np, cv2.COLOR_BGR2YUV)
    # do a black and white transform first to get better luminance values

orig_yuv = cv2.cvtColor(orig_np, cv2.COLOR_BGR2YUV)
    hires = np.copy(orig_yuv)
    hires[:, :, 1:3] = color_yuv[:, :, 1:3]
    final = cv2.cvtColor(hires, cv2.COLOR_YUV2BGR)
    final = PilImage.fromarray(final)
print('final', type(final))
return finalWe create another _post_process method. We turn the image into numpy arrays to do operations on them.
color_np = np.asarray(raw_color)
orig_np = np.asarray(orig)
color_yuv = cv2.cvtColor(color_np, cv2.COLOR_BGR2YUV)
# do a black and white transform first to get better luminance values
orig_yuv = cv2.cvtColor(orig_np, cv2.COLOR_BGR2YUV)
hires = np.copy(orig_yuv)
hires[:, :, 1:3] = color_yuv[:, :, 1:3]
final = cv2.cvtColor(hires, cv2.COLOR_YUV2BGR)
final = PilImage.fromarray(final)MasterFilter is class that will store all gathered filters collected.
class MasterFilter(BaseFilter):
  def __init__(self, filters: List[IFilter], render_factor: int):
    self.filters = filters
    self.render_factor = render_factor

  def filter(
      self, orig_image: PilImage, filtered_image: PilImage, render_factor: int = None, post_process: bool = True) -> PilImage:
      render_factor = self.render_factor if render_factor is None else render_factor

      for filter in self.filters:
        filtered_image = filter.filter(orig_image, filtered_image, render_factor, post_process)

      return filtered_image
The class takes in a list of filters and the render factor. Another filter method is created Same parameters as before. Here the render factor is defined taking in the render_factor as an argument. If not it will use the default render factor.
Then it has a loop going though all the filters and applying the filter method to them.
ModelViewerVisualer
class ModelImageVisualizer:
    def __init__(self, filter: IFilter, results_dir: str = None):
      self.filter = filter
      self.results_dir = None if results_dir is None else Path(results_dir)
      self.results_dir.mkdir(parents=True, exist_ok=True)
ModelImageVisualizer one of the most important classes in this whole repo. The reason why is gathers the rest of the object in the repo the FastAI learner, filters and coverts them into a viewable image. All of all work from above will not be used in this class allowing us to see the results.
The ModelImageVisualizer(MIV) creates numerous helper functions to manipulate the image. I will talk about the most important ones.
def _get_image_from_url(self, url: str) -> Image:
      response = requests.get(url,timeout=30, headers={'user-agent':'Mozilla/5.0 (Windows NT 10.0; Win64; x64) AppleWebKit/537.36 (KHTML, like Gecko) Chrome/62.0.3202.94 Safari/537.36'} )
      img = PIL.Image.open(BytesIO(response.content)).convert('RGB')
      return img
This gets an PIL image from an url. This will be used for the next method.
def plot_transformed_image_from_url(
        self,
        url: str,
        path: str = 'test_images/image.png',
        results_dir: Path = None,
        figsize: Tuple[int, int] = (20, 20),
        render_factor: int = None,

        display_render_factor: bool = False,
        compare: bool = False,
        post_process: bool = True,
        watermarked: bool = True,
    ) -> Path:
        img = self._get_image_from_url(url)
        img.save(path)
        # print('results_dir: ', results_dir)
        return self.plot_transformed_image(path=path,
                                          results_dir=results_dir,
                                          figsize=figsize,
                                          render_factor=render_factor,
                                          display_render_factor=display_render_factor,
                                          compare=compare,
                                          post_process=post_process,
                                          watermarked=watermarked)
def plot_transformed_image_from_url(
self,
url: str,
path: str = 'test_images/image.png',
results_dir: Path = None,
figsize: Tuple[int, int] = (20, 20),
render_factor: int = None,
display_render_factor: bool = False,
compare: bool = False,
post_process: bool = True,
watermarked: bool = True,
) -> Path:
img = self._get_image_from_url(url)
        img.save(path)
# print('results_dir: ', results_dir)
return self.plot_transformed_image(path=path,
                                          results_dir=results_dir,
                                          figsize=figsize,
                                          render_factor=render_factor,
                                          display_render_factor=display_render_factor,
                                          compare=compare,
                                          post_process=post_process,
watermarked=watermarked)We have a lot parameters for this method. Mainly because we passing arguments about storing the image and where to get it from. Also extra parameters for plotting options when the colorization is complete.
img = self._get_image_from_url(url)
img.save(path)We use the get image from url earlier. And have it inside a dummy folder.
Afterwards
return self.plot_transformed_image(path=path,
results_dir=results_dir,
figsize=figsize,
render_factor=render_factor,
display_render_factor=display_render_factor,
compare=compare,
post_process=post_process,
watermarked=watermarkedWe pass the image into the plot_transformed_image. This passes the arguments from this method into the plot_transformed_image. We can see arguments are passed to various methods
def plot_transformed_image(
        self,
        path: str,
        results_dir: Path = None,
        figsize: Tuple[int, int] = (20, 20),
        render_factor: int = None,
        display_render_factor: bool = False,
        compare: bool = False,
        post_process: bool = True,
        watermarked: bool = True,
    ) -> Path:
        path = Path(path)
        if results_dir is None:
          results_dir = Path(self.results_dir)
        result = self.get_transformed_image(
            path, render_factor, post_process=post_process, watermarked=watermarked
        )
        orig = self._open_pil_image(path)
We load path into a variable. Then we check if the results is empty. If so, then we create a path for results directory. The result of the colorised image will be saved results varible. Which the get_trasformed_image from earlier will be called.
orig = self._open_pil_image(path)We get the original non-coloured image and save in org varible. This will be used for image comparison.
if compare:
          self._plot_comparison(
              figsize, render_factor, display_render_factor, orig, result
          )
        else:
          self._plot_solo(figsize, render_factor, display_render_factor, result)
If we have the compare argument set to true. Then we would call plot_comparsion if not we just plot the colorized result.
If you noticed by now, that sizeable chuck are helper functions. Allows you interact will the model the easiest way possible. With fiddling with small details.
orig.close()
        result_path = self._save_result_image(path, result, results_dir=results_dir)
        result.close()
        return result_path
We close the paths of images and we save result image in the results folder.
def _plot_comparison(
        self,
        figsize: Tuple[int, int],
        render_factor: int,
        display_render_factor: bool,
        orig: Image,
        result: Image,

    ):
        fig, axes = plt.subplots(1, 2, figsize=figsize)
        self._plot_image(
            orig,
            axes=axes[0],
            figsize=figsize,
            render_factor=render_factor,
            display_render_factor=False,
        )
        self._plot_image(
            result,
            axes=axes[1],
            figsize=figsize,
            render_factor=render_factor,
            display_render_factor=display_render_factor,
        )
Simple matplotlib plots, wont go into detail with this one.
def _plot_solo(
        self,
        figsize: Tuple[int, int],
        render_factor: int,
        display_render_factor: bool,
        result: Image,
    ):
      fig, axes = plt.subplots(1, 1, figsize=figsize)
      self._plot_image(
          result,
          axes=axes,
          figsize=figsize,
          redner_factor=render_factor,
          display_render_factor=display_render_factor,
Save results of image
def _save_result_image(self, source_path: Path, image: Image, results_dir = None) -> Path:
        if results_dir is None:
            results_dir = Path(self.results_dir)
        result_path = results_dir / source_path.name
        image.save(result_path)
        return result_path
This internal method was called in transformed image. The method simply takes in the source_path of image. And the PIL image itself. The method saves image inside the results directory with name attached.
def get_transformed_image(
        self, path: Path, render_factor: int = None, post_process: bool = True,
        watermarked: bool = True
    ) -> Image:
        self._clean_mem()
        orig_image = self._open_pil_image(path)
        filtered_image = self.filter.filter(
            orig_image, orig_image, render_factor=render_factor,post_process=post_process
        )
        if watermarked:
          return get_watermarked(filtered_image)

        return filtered_image
def _plot_image(
self,
image: Image,
render_factor: int,
axes: Axes = None,
figsize=(20,20),
display_render_factor = False,
):
if axes is None:
_, axes = plt.subplots(figsize=figsize)
axes.imshow(np.asarray(image) / 255)
axes.axis('off')
if render_factor is not None and display_render_factor:
plt.txt(
10,
10,
'render_factor: ' + str(render_factor),
color='white',
backgroundcolor='black',
)Internal method to help plot the images.
Now lets creating Fastai Learner. So we can export out Unet:
def unet_learner_deep(
    data: DataBunch,
    arch: Callable,
    pretrained: bool = True,
    blur_final: bool = True,
    norm_type: Optional[NormType] = NormType,
    split_on: Optional[SplitFuncOrIdxList] = None,
    blur: bool = False,
    self_attention: bool = False,
    y_range: Optional[Tuple[float, float]] = None,
    last_cross: bool = True,
    bottle: bool = False,
    nf_factor: float = 1.5,
    **kwargs: Any
) -> Learner:
Most of these parameters should be familiar to you. As we defined many of them when creating the U-net arch.
"Build Unet learner from `data` and `arch`."
     meta = cnn_config(arch)
     body = create_body(arch, pretrained)
     model = to_device(
         DynamicUnetDeep(
             body,
             n_classes=data.c,
             blur=blur,
             blur_final=blur_final,
             self_attention=self_attention,
             y_range=y_range,
             norm_type=norm_type,
             last_cross=last_cross,
             bottle=bottle,
             nf_factor=nf_factor
         ),
         data.device,
     )
We get the metadata of the U-net. The we cut the U-net using the create_body method. Then we run the DyamicUnetDeep class into the device. We pass the body as the encoder.
learn = Learner(data, model, **kwargs)
     learn.split(ifnone(split_on, meta['split']))
     if pretrained:
        learn.freeze()
     apply_init(model[2], nn.init.kaiming_normal_)
     return learn
We store the learner object in a variable
https://fastai1.fast.ai/basic_train.html#Learner.split
As the layers are pretrained we can use spilt function to create layer groups. As freeze the weights that we don’t want adjusted. The we use the appy_init function to initalise the layers.
def gen_learner_deep(data: ImageDataBunch, gen_loss, arch=models.resnet34, nf_factor: float = 1.5) -> Learner:
  return unet_learner_deep(
      data,
      arch,
      wd=1e-3,
      blur=True,
      norm_type=NormType.Spectral,
      self_attention=True,
      y_range=(-3.0, 3.0),
      loss_func=gen_loss,
      nf_factor=nf_factor,

  )
This class helps abstracts away the details of the unet_learner_deep class. Making it more user friendly.
# Weights are implicitly read from ./models/ folder
def gen_inference_deep(
    root_folder: Path, weights_name: str, arch=models.resnet34, nf_factor: float = 1.5) -> Learner:
    data = get_dummy_databunch() # use a placeholder data, to help export pretrained model
    learn = gen_learner_deep(
        data=data, gen_loss=F.l1_loss, arch=arch, nf_factor=nf_factor
    )
    learn.path = root_folder
    learn.load(weights_name)
    learn.model.eval()
    return learn
Here we pass dummy data, as we not training the model. We create class that will that take in pretrained weights and funnel them into the model.
def get_artistic_image_colorizer(
    root_folder: Path = Path('./'),
    weights_name: str = 'ColorizeArtistic_gen',
    results_dir='result_images',
    render_factor: int = 35,

) -> ModelImageVisualizer:
     learn = gen_inference_deep(root_folder=root_folder, weights_name=weights_name)
     filtr = MasterFilter([ColorizerFilter(learn=learn)], render_factor=render_factor)
     print('filter', filtr)
     vis = ModelImageVisualizer(filtr, results_dir=results_dir)
     print('vis', vis)
     return vis
Now all of the helper classes we created are now coming to together. We will pass the weights and the directory of the results. We first define the learner object. With root path and weight name being passed. Then we collected filtered images from MasterFilter from the ColorizerFilter. The learn object is passed as argument because we are using the U-net to extract filters from the Image.
Now it comes together with modelimagevisualiser
def get_image_colorizer(root_folder: Path = Path('./'), render_factor: int = 35, artistic: bool = True) -> ModelImageVisualizer:
  if artistic:
    return get_artistic_image_colorizer(root_folder=root_folder, render_factor=render_factor)
  else:
    return get_stable_image_colorizer(root_folder=root_folder, render_factor=render_factor)
Another helper function that allows us to decide between different colorizers. Stable leads to less failure modes. But look washed out. Artistic colorizer has great results but more likely to break.
def show_image_in_notebook(image_path: Path):
  ipythondisplay.display(ipythonimage(str(image_path))) #put into class
Now starting the program
!mkdir 'models'
!wget https://data.deepai.org/deoldify/ColorizeArtistic_gen.pth -O ./models/ColorizeArtistic_gen.pth
colorizer = get_image_colorizer(artistic=True)We call the colorizer
!mkdir test_images
!touch placeholder.txt
We create a placeholder folder and file, bug in code.
source_url = 'https://i.imgur.com/AIpVTYQ.jpeg' #@param {type:"string"}
render_factor = 35  #@param {type: "slider", min: 7, max: 40}
watermarked = True #@param {type:"boolean"}

if source_url is not None and source_url !='':
    image_path = colorizer.plot_transformed_image_from_url(url=source_url, render_factor=render_factor, compare=True, watermarked=watermarked)
    show_image_in_notebook(image_path)
else:
    print('Provide an image url and try again.')
Now we pass in the source_url and the render factor.
if source_url is not None and source_url !='':
    image_path = colorizer.plot_transformed_image_from_url(url=source_url, render_factor=render_factor, compare=True, watermarked=watermarked)
Checks if source url is empty. Then calls the plot_transfomed image. Which are image (source_url) is passed to.
show_image_in_notebook(image_path)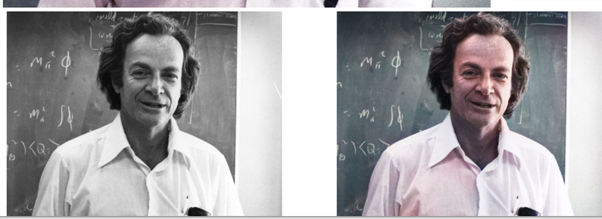
There is a lot of details that I missed, like how precisely does U-net convert a Black and white photo in color form. I don’t have a firm answer. How do some accepts like blur work. I decide to cut these because the project timeline was taking way to long.
If you like more of my projects, I provide occasional updates on my email list. Follow me on twitter and send me a DM. I want to meet new people in the ML space.
Likely will be working on diffusion models next or some type ESG/climate data project.